How to Check Electrical Grounding in Your House
Electrical grounding protects your home from shocks and electrical fires. Understanding how to check electrical grounding in your house ensures your family stays safe.
Why Electrical Grounding Matters
Electrical grounding is a critical safety feature in every home. It provides a safe path for excess electricity to flow into the earth, preventing electrical shocks, appliance damage, and fire hazards. When you understand how to check electrical grounding in your house, you can identify potential problems before they become dangerous.
What Does Grounding Do?
A properly grounded electrical system:
- Protects against electrical shock
- Prevents damage to sensitive electronics
- Reduces fire risk from electrical faults
- Stabilizes voltage levels throughout your home
Warning Signs of Poor Grounding
Before testing, look for these indicators that your home electrical grounding may be compromised:
- Frequent circuit breaker trips
- Mild shock or tingling when touching appliances
- Burning smell near outlets or electrical panel
- Flickering or dimming lights
- Outlets that feel warm to the touch
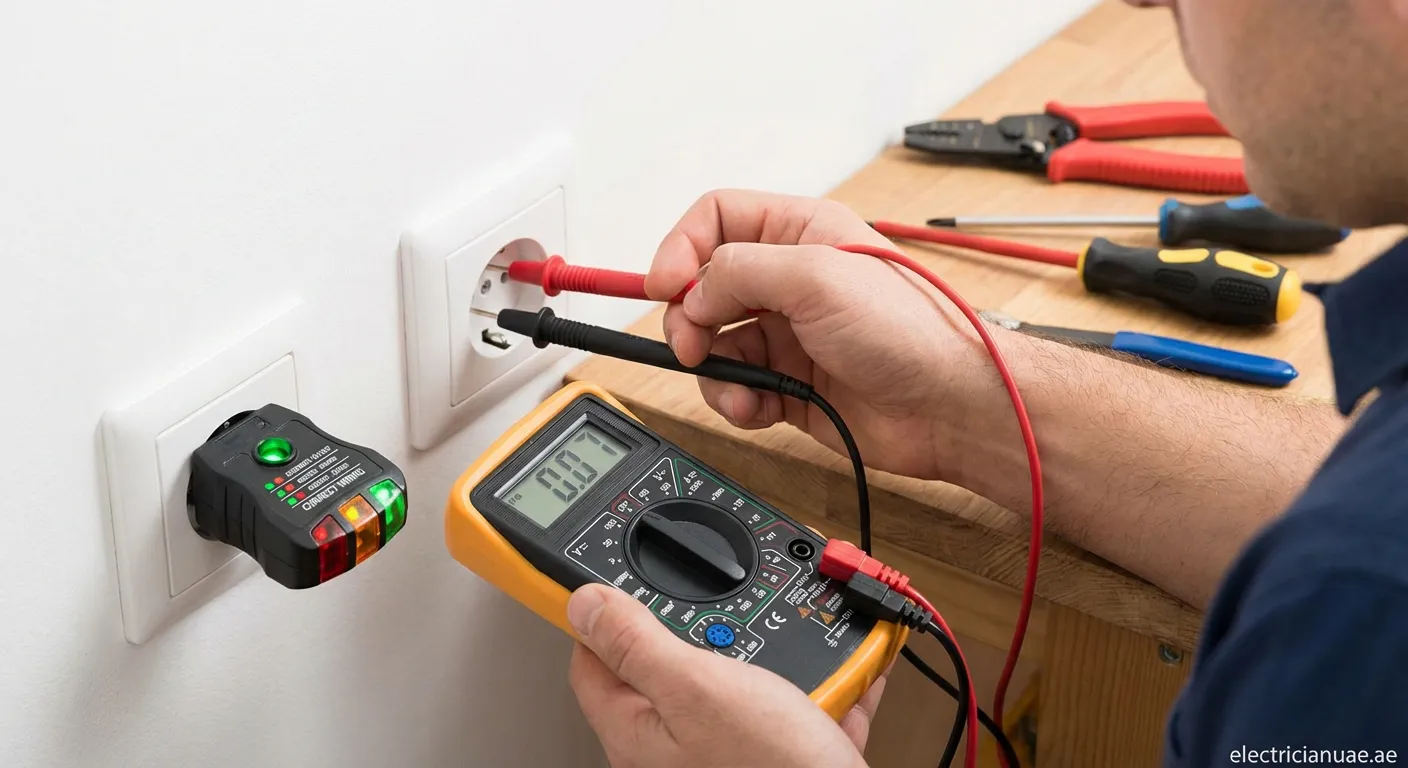
Tools You Need for Testing
To check electrical grounding in your house, gather these essential tools:
- Circuit tester (outlet tester) – available at hardware stores
- Multimeter – for more detailed measurements
- Flashlight – for inspecting electrical panel
- Safety gloves – for protection
Important: Always turn off power at the main breaker before inspecting electrical panels or wiring.
How to Test Grounding at Outlets
Using a Circuit Tester
- Plug in the tester into each outlet throughout your home
- Check the indicator lights – most testers have three lights that show wiring status
- Interpret the results:
- Two amber lights = properly grounded and wired
- Single light or different pattern = potential grounding issue
- Document problem outlets for professional inspection
Using a Multimeter
For more detailed testing:
- Set the multimeter to AC voltage (200V range)
- Insert the black probe into the neutral slot (longer opening)
- Insert the red probe into the ground opening (rounded hole)
- A reading near 120V indicates proper grounding
- A reading near 0V suggests a grounding problem
Inspecting Your Electrical Panel
Your main electrical panel houses the grounding connection. Here's what to check:
- Grounding rod wire: A thick copper wire running from the panel to a metal rod outside
- Grounding conductor connections: Should be tight and corrosion-free
- Bonding: Metal water pipes should be bonded to the grounding system
When to Call a Professional
While learning how to check electrical grounding in your house is valuable, some situations require expert help:
- You discover multiple ungrounded outlets
- The electrical panel shows signs of damage or corrosion
- You live in an older home (pre-1960s) without updated wiring
- Test results indicate serious grounding issues
Frequency of Grounding Checks
Schedule electrical grounding inspections:
- Every 3-5 years for older homes
- After major electrical work or renovations
- When purchasing a new home
- Following any electrical incidents or storms
Stay Safe with Regular Grounding Checks
Knowing how to check electrical grounding in your house helps maintain a safe home environment. Regular testing, combined with professional inspections, prevents electrical hazards. If you're in the Murbaḩ area, our Electrical-repair Murbaḫ service offers expert grounding inspection and repair. Don't compromise on electrical safety—schedule your inspection today.