How to Wire a Irrigation System: A Complete Guide
Setting up an automatic sprinkler system saves time and keeps your lawn healthy. This guide explains exactly how to wire a irrigation system safely and effectively.
Installing an automatic watering system is a fantastic way to maintain a lush garden while conserving water. However, the electrical aspect often intimidates homeowners. Understanding how to wire a irrigation system is straightforward if you follow the right steps and safety protocols. This guide breaks down the process into manageable parts.
Understanding the Components
Before grabbing your tools, it is crucial to understand what you are connecting. The main components include:
- The Controller (Timer): The brain of the system that tells the valves when to open.
- Solenoid Valves: These open and close to control water flow to specific zones.
- Multi-strand Wire: Special direct-burial wire used to connect the controller to the valves.
Tools and Materials Required
To successfully learn how to wire a irrigation system, you will need the following tools:
- Wire strippers and cutters.
- Waterproof wire connectors (grease caps).
- Screwdrivers (flathead and Phillips).
- Multi-conductor irrigation wire (usually 18-gauge).
Step-by-Step Guide on How to Wire a Irrigation System
1. Planning the Wire Run
Start by running your multi-strand wire from the controller location to the valve box. Ensure you use wire rated for underground use. It is wise to leave a little extra slack at both ends to make maintenance easier later.
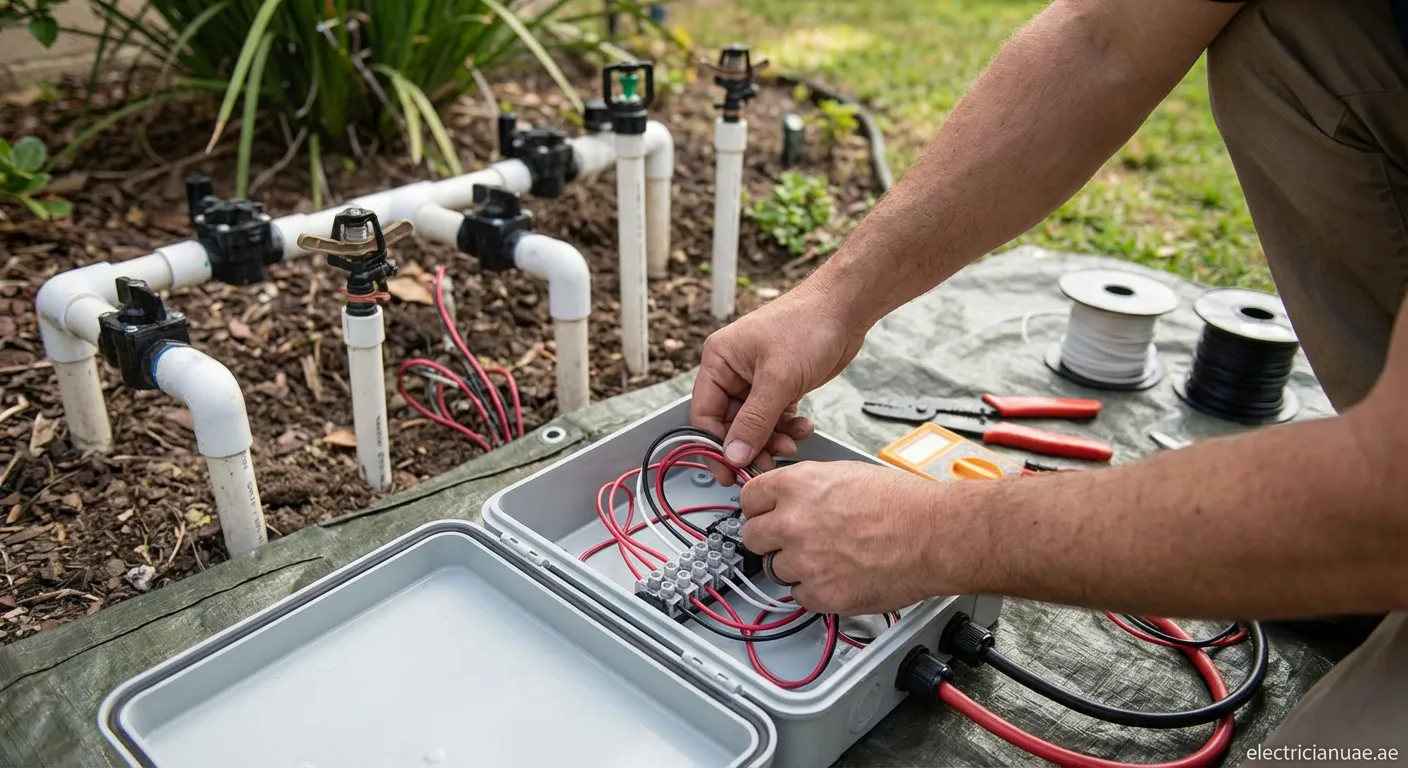
2. Connecting the Solenoid Valves
In the valve box, you will see two wires coming out of each solenoid.
- Common Wire: Take one wire from each solenoid and twist them all together along with the white wire from your multi-strand cable. This white wire serves as the "Common" connection for the entire system. Secure this connection with a waterproof connector.
- Station Wires: Connect the remaining wire from each solenoid to a distinct colored wire in your multi-strand cable. For example, connect valve 1 to the red wire, valve 2 to the blue wire, and so on. Record which color corresponds to which zone.
3. Wiring the Controller
Now, head back to the controller. Strip the insulation off the ends of the multi-strand wire.
- Insert the white wire into the terminal labeled "COM" or "C" (Common).
- Insert each colored wire into the numbered terminals corresponding to the zones you set up in the valve box (e.g., Red to terminal 1, Blue to terminal 2).
4. Power Connection
Most residential controllers run on 24V AC via a transformer. Connect the transformer wires to the terminals labeled "24VAC". Always ensure the power is off at the breaker before connecting the main power source if hardwiring.
Troubleshooting Common Issues
If your system doesn't work after learning how to wire a irrigation system, check these common faults:
- Loose Connections: Ensure all wires in the controller are tight.
- Corrosion: If waterproof caps weren't used, moisture might have corroded the valve connections.
- Cut Wires: Digging in the garden can accidentally sever underground wires.
By following these instructions, you can ensure a reliable and automated watering schedule for your landscape.
Final Thoughts on Wiring
Proper wiring ensures your garden gets the water it needs without faults. If you require professional help with outdoor electrical setups, check out our service for Socket-installation Fahlain. We ensure safe and reliable connections.